Ahhhh, professional development courses.....
This one was held over three days at the QBI at UQ and hosted by JLM Accutek, the Australian distributors for Brain Products.The lecturer was Dr. Ingmar Gutberlet.
The course was very intensive. Three days of technical demonstrations and in depth software tutorial sessions. I'm still digesting everything that we covered. I guess it will only really sink in once I get some serious practice time back home.
Being on campus at UQ has also been something quite thought provoking. Its pretty intimidating to go from a relatively tiny regional campus to one of the G8 campuses. Something of a culture shock. I have probably got just as much to think about from the campus experience and the people I've met as the content of the course.
One thing that does need some comment is the quality of the accommodation. I have to say that for the price we paid, I feel we didn't get value for money.
The room takes some figuring out. The weather is freezing at night because of the river and you need to wake up intermittently and turn on the air conditioner which turns out to sound like a small jet engine. This makes sleeping a bit challenging.
The plumbing is terrible. They're on a water saving kick so someone has gone around and sabotaged the shower with some flow restrictor and a water saving nozzle. The difference between arctic and third degree burns is a very fine line.
And then there's the alarm clock. This consists of a 20 ton excavator tearing up a giant hole right beside the building. Strangely enough the digging starts at about 7am every day and seems to be done for the day about half an hour later. Perhaps its just my persecution complex....
I have to say that I was surprised by the attendance pattern of some of the other attendees. I get that they're busy and have other calls on their time but it seems like such a waste to sign up and show up for only a couple of sessions. Fully half the attendees were AWOL most of the time. Makes you wonder what they were getting out of it that was worth the price.
I think many of the attendees were there to get some practical skills that were applicable to a particular problem they were facing in their work. Perhaps they were just more able to discriminate the sessions that were appropriate for their work. I was a bit of a kid in a candy shop. Everything was good.
Some of the software was a bit rugged; that's the nature of these kinds of systems, half of its a hack and half of its done but lacking polish. Usually its just amazing that it works as well as it does. It's an incredibly complex domain to work with and the market place is both saturated and the customers are non-uniform, so the number of users of most features may be quite low. Makes for a hard business environment and low margins.
The people here are different. I've never before been surrounded by such a bunch of high achievers. This is no bad thing as it has provided a real learning experience. There are so many things I need to work on that are just not getting exercise at Coffs. I understand some of the more traveled staff a little better now.
I've spent the time harvesting ideas from everything. The workshop, the people, the campus, the software, the uni website. Maybe it was just the scary amount of coffee I've been drinking to try to stay awake and the sense of being away from the usual distractions. Now I just need the time to write some of it up before it all turns to smoke.
I need to figure out a good time to leave tomorrow to miss the rush hour traffic. It was insane coming up. I managed to hit the rush about 110km south of Brisbane and was in rush hour traffic for more than an hour at freeway speeds. Not really good when the fatigue is at its maximum.
Back to thinking and catching up on all the work that's been piling up....
Friday, July 16, 2010
Thursday, July 1, 2010
Building a Calibration Wand for a Phasespace Motion Capture System from a Walkingstick
This post is documenting an interesting hardware hack.
The background.
A research project has just landed that involves using our Phasespace motion capture system. Since its been idle for some time, I turned it on to check it out and remind myself how all the bits worked. Obviously it was broken.
So after replacing a video card in the hub computer and figuring out that the batteries in the LED driver units were dead, I finally got the rig up and talking. Then found that the calibration wand was non-functional. Goes without saying really... IGOR rule 101 states "Any equipment left in the proximity of students will be TOUCHED, no matter what you say, how well its locked up or how many signs are erected."
The wand is one of those "damage magnets"! Its just too visually attractive. People are fascinated with it and will ask about it first out of all the equipment. It's just too pretty to live!
Anyway, today's IGOR hack-of-the-day is to build a calibration wand for a Phasespace (http://www.phasespace.com/) motion capture system.
Step 1 Scrounging
Find something to use as the wand shaft. Search the store rooms and the junk pile in my office. Nothing... nothing ... nothing. Almost going to go to metal fabrication and scrounge there when I find an old walking stick that was given to someone as a joke. Perfect. Also it has a bit more chic than a length of plastic pipe or whatever else I might have found.
Step 2 Procurement
Think quick and figure out how to attach a string of Multi-LED's to the stick without destroying the multi-LED's. They have a Velcro backing so all I need is some Velcro and some hot-melt glue. Time for a "Bunnings Run"(TM)
Shopping list
Hot-melt glue gun and reloads
Some Velcro cable holding tape
More cable ties

Step 3 Assemble the stick
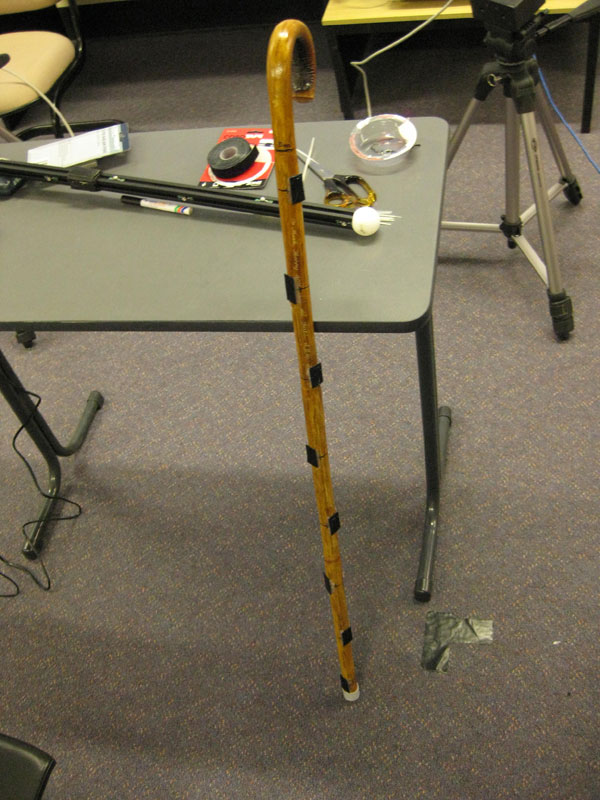
 Here you can see the walking stick measured up and with pieces of the Velcro tape glued strategically in place. Alternating by 90 degrees around the front of the stick.
 Here is a detail of two Velcro pads.

When one of the pads is out of alignment. Rip it off and do it again.

And a final overview of the stick and Velcro assembly.
Step 4 Building the wiring loom
Wire spool
Punch down tool
Punch down connectors

Now measure out the wire. Remember to add a bit of slack between each LED position as they are fiddly to position and you don't want them under any tension. Velcro vs wire will also end one way. Wire wins!
Careful of the punch down tool too. It doesn't really work the way its intended on heavy insulated speaker wire. Mostly it tries to puncture your finger rather than securing the wire.

I use a knife to split the wire strands and then remove some of the insulation to help the punch down connector make a good connection.

Once you have all the connectors on and facing the right way. Put some hot glue in the back of each one to make sure its not going to come off the loom. Let it cool and pull off the hot glue cobwebs.
Step 5 Assembly

Assemble the stick. Lots of cable ties make it look better.

Add a LED driver. Cable ties make everything good.

Now, plug in and turn the whole system on, put it into calibration mode and you can test your wiring. Note how only three of the eight LED's work. Debugging time! Cut off all the cable ties....
Now take it apart again, pull the cable out of the connectors and hot glue, clean the glue off, cut away a little bit more insulation and re-assemble the wiring loom. This time, before you put the glue in each connector, assemble and test using calibration mode again. If the connector still does not work, cut away a little more insulation until you have bare wire and then punch it down into the connector again. When all are working. Glue them up again.
 Note the working LED's this time.
I now have a functional Calibration Wand. All I need to do is change the values in the wand.rb file to match the position of the LED's on this wand and I can get the system calibrated. Get out the ruler and begin measuring...
And that's all folks. Pretty straight forward.
The background.
A research project has just landed that involves using our Phasespace motion capture system. Since its been idle for some time, I turned it on to check it out and remind myself how all the bits worked. Obviously it was broken.
So after replacing a video card in the hub computer and figuring out that the batteries in the LED driver units were dead, I finally got the rig up and talking. Then found that the calibration wand was non-functional. Goes without saying really... IGOR rule 101 states "Any equipment left in the proximity of students will be TOUCHED, no matter what you say, how well its locked up or how many signs are erected."
The wand is one of those "damage magnets"! Its just too visually attractive. People are fascinated with it and will ask about it first out of all the equipment. It's just too pretty to live!
Anyway, today's IGOR hack-of-the-day is to build a calibration wand for a Phasespace (http://www.phasespace.com/) motion capture system.
Step 1 Scrounging
Find something to use as the wand shaft. Search the store rooms and the junk pile in my office. Nothing... nothing ... nothing. Almost going to go to metal fabrication and scrounge there when I find an old walking stick that was given to someone as a joke. Perfect. Also it has a bit more chic than a length of plastic pipe or whatever else I might have found.
Step 2 Procurement
Think quick and figure out how to attach a string of Multi-LED's to the stick without destroying the multi-LED's. They have a Velcro backing so all I need is some Velcro and some hot-melt glue. Time for a "Bunnings Run"(TM)
Shopping list
Hot-melt glue gun and reloads
Some Velcro cable holding tape
More cable ties

Step 3 Assemble the stick


When one of the pads is out of alignment. Rip it off and do it again.
And a final overview of the stick and Velcro assembly.
Step 4 Building the wiring loom
Wire spool
Punch down tool
Punch down connectors

Now measure out the wire. Remember to add a bit of slack between each LED position as they are fiddly to position and you don't want them under any tension. Velcro vs wire will also end one way. Wire wins!
Careful of the punch down tool too. It doesn't really work the way its intended on heavy insulated speaker wire. Mostly it tries to puncture your finger rather than securing the wire.

I use a knife to split the wire strands and then remove some of the insulation to help the punch down connector make a good connection.

Once you have all the connectors on and facing the right way. Put some hot glue in the back of each one to make sure its not going to come off the loom. Let it cool and pull off the hot glue cobwebs.
Step 5 Assembly

Assemble the stick. Lots of cable ties make it look better.

Add a LED driver. Cable ties make everything good.

Now, plug in and turn the whole system on, put it into calibration mode and you can test your wiring. Note how only three of the eight LED's work. Debugging time! Cut off all the cable ties....
Now take it apart again, pull the cable out of the connectors and hot glue, clean the glue off, cut away a little bit more insulation and re-assemble the wiring loom. This time, before you put the glue in each connector, assemble and test using calibration mode again. If the connector still does not work, cut away a little more insulation until you have bare wire and then punch it down into the connector again. When all are working. Glue them up again.

I now have a functional Calibration Wand. All I need to do is change the values in the wand.rb file to match the position of the LED's on this wand and I can get the system calibrated. Get out the ruler and begin measuring...
And that's all folks. Pretty straight forward.
Subscribe to:
Posts (Atom)